
Route Add/Delete in xRMS
Instructions for Creating or working with Routes in xRMS
1. Overview
Chain and or Customer Numbers are assigned to Routes, likewise, Drivers, Companies and Distribution Centers are assigned to Routes. Routes are an important part of the Route Accounting system in that Routes group customers deliveries together so that the delivery process is more streamlined.
Important Note: Once a company is live with XRMS, a Route should never be deleted, it should ONLY be made Inactive.
2. Route File Maintenance
2.1 Route File Maintenance (Main Screen)
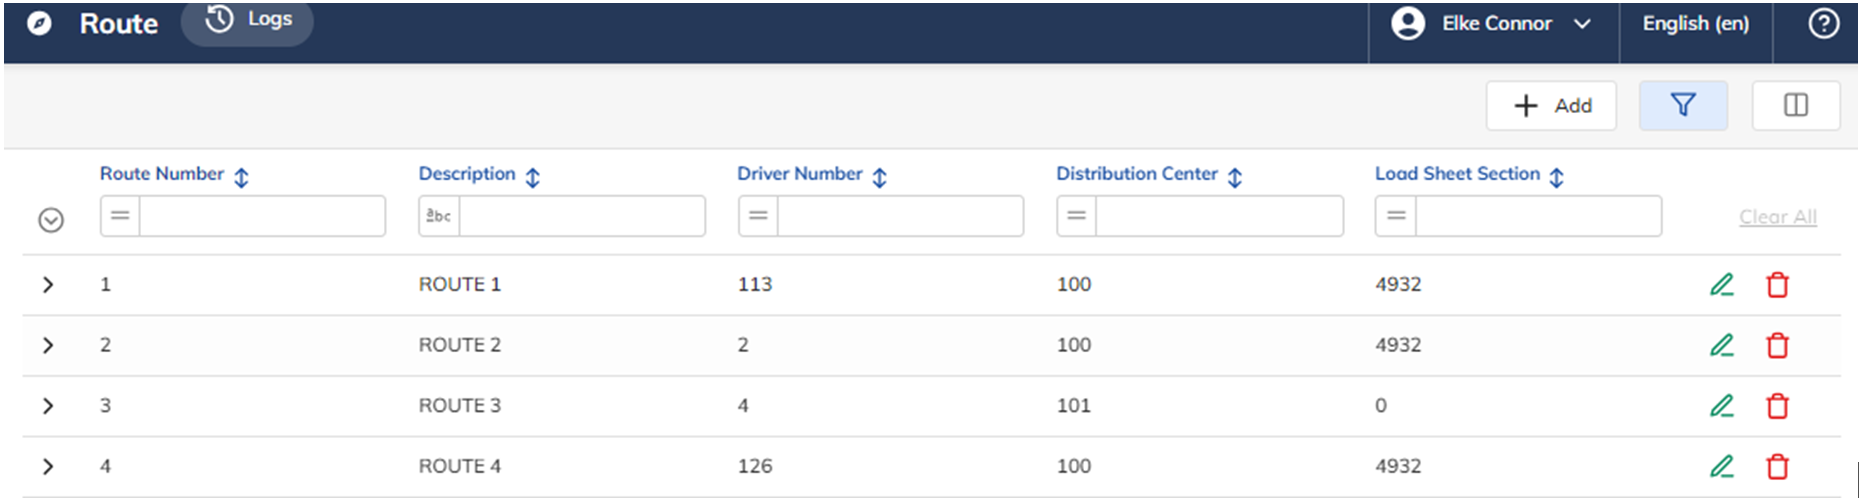
Fields
Field | Required Optional | Recommended / Notes |
Route Number | Required | Identifies the delivery Route Number, up to 6 digits |
Route Description | Required
| Identifies the Route Description, up to 30 alphanumeric characters |
Driver Number | Required | Identifies the Driver Number, the driver number is located in the Customer file, always Chain 99999, Customer 123 |
Distribution Center | Required | Identifies the Distribution Center |
Load Sheet Section | Optional | Identifies the Load Sheet Section for the Route to print |
2.2 Adding a Route to the Route file
Procedures
Step | Action |
1 | Select the “+ Add” icon. The following screen displays. |
2 | Populate all other fields you would like, upon completion, press SAVE Note: Any fields highlighted in the color red are mandatory fields and need to be populated |
Route File – Route General Screen
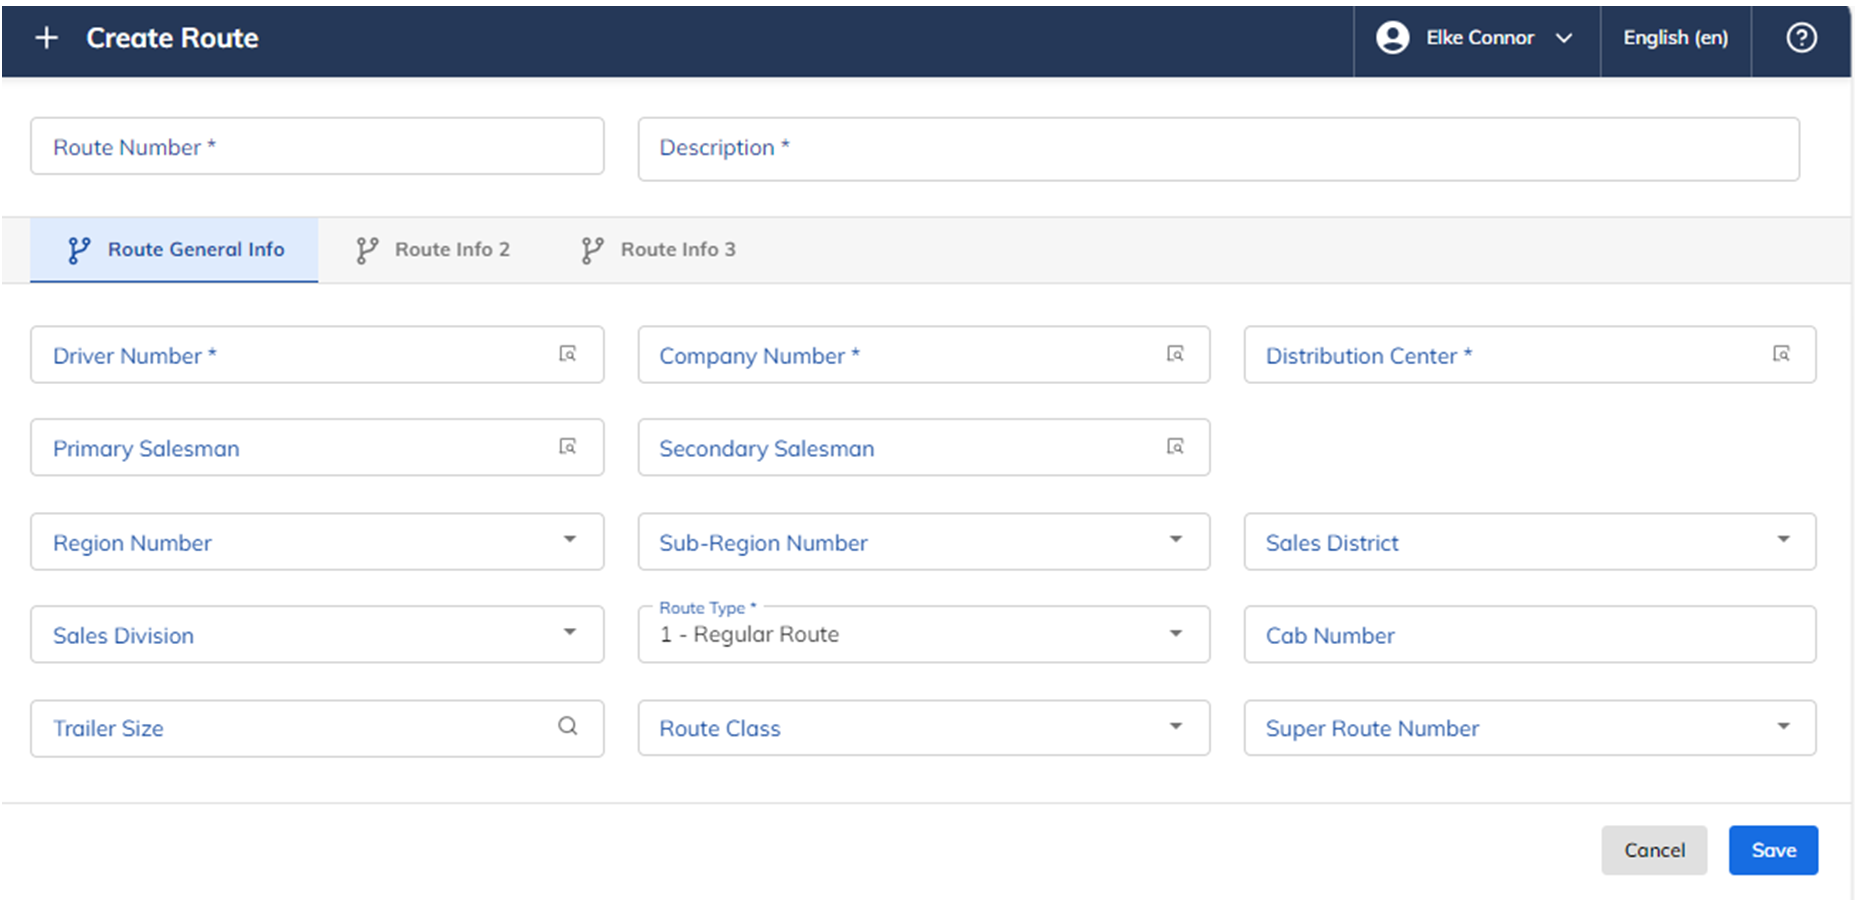
Fields
Field | Value | Recommended / Notes |
Route Number | Required | Identifies the delivery Route Number, up to 6 digits |
Description | Required | Identifies the Route Description, up to 30 alphanumeric characters |
Driver Number | Required | Identifies the Driver Number, the driver number is located in the Customer file, always Chain 99999, Customer 123 |
Company Number | Required | Identifies the Company Number |
Distribution Center | Required | Identifies the Distribution Center Number |
Primary Salesman | Optional | Identifies the Primary Salesman |
Secondary Salesman | Optional | Identifies the Secondary Salesman |
Region Number | Optional | Code used to group items together for reporting, item prompt inquiries and mass price maintenance purposes. If used, valid Region Numbers (Code Type “RN”) must exist in the codes file |
Sub-Regon Number | Optional | Code used to group items together for reporting, item prompt inquiries and mass price maintenance purposes. If used, valid Sub-Regions (Code Type “SUBREG”) must exist in the codes file |
Sales District | Optional | Code used to group items together for reporting, item prompt inquiries and mass price maintenance purposes. If used, valid Sales District (Code Type “SD”) must exist in the codes file |
Sales Division | Optional | Code used to group items together for reporting, item prompt inquiries and mass price maintenance purposes. If used, valid Sales Division (Code Type “SV”) must exist in the codes file |
Route Type | Optional | Identifies the Route Type, chose one, Regular, Independent, Independent Charge do not credit, Super Route and Thrift Store Route |
Cab Number | Optional | Identifies the Cab Number |
Trailer Size | Optional | Identifies the Trailer Size |
Route Class | Optional | Identifies the Route Class |
Super Route Number | Optional | Identifies the Super Route Number |
Route Info 2
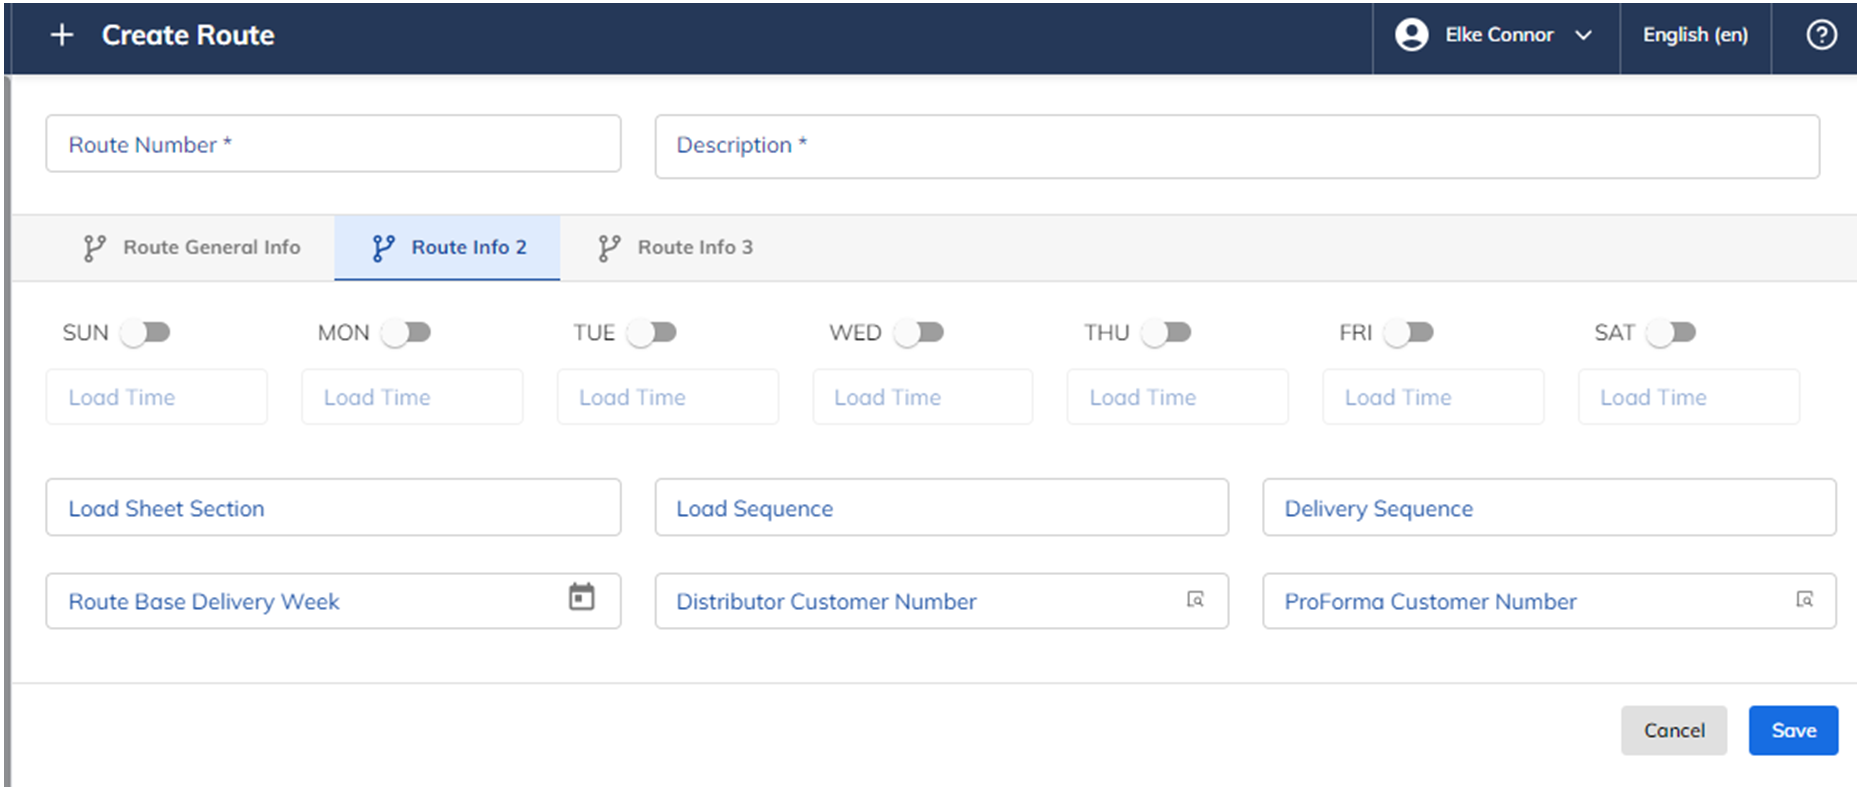
Fields
Field | Value | Recommended / Notes |
Delivery Days | Required | Identifies the Route Delivery Day – Select Sunday - Saturday |
Load Time | Optional | Identifies the Load Time of the route |
Load Sheet Section | Optional | Identifies the Load Sheet Section the Route will print in when Load Sheets are printed |
Delivery Sequence | Optional | Identifies the Delivery Sequence of the Route Number |
Route Base Delivery Week | Required | Identifies the Day 1 for the Route Delivery Week |
Distributor Customer Number | Optional | Identifies the Distributor Chain and Customer Number |
ProForma Customer Number | Optional | Identifies the Proforma Chain and Customer Number |
Route Info 3
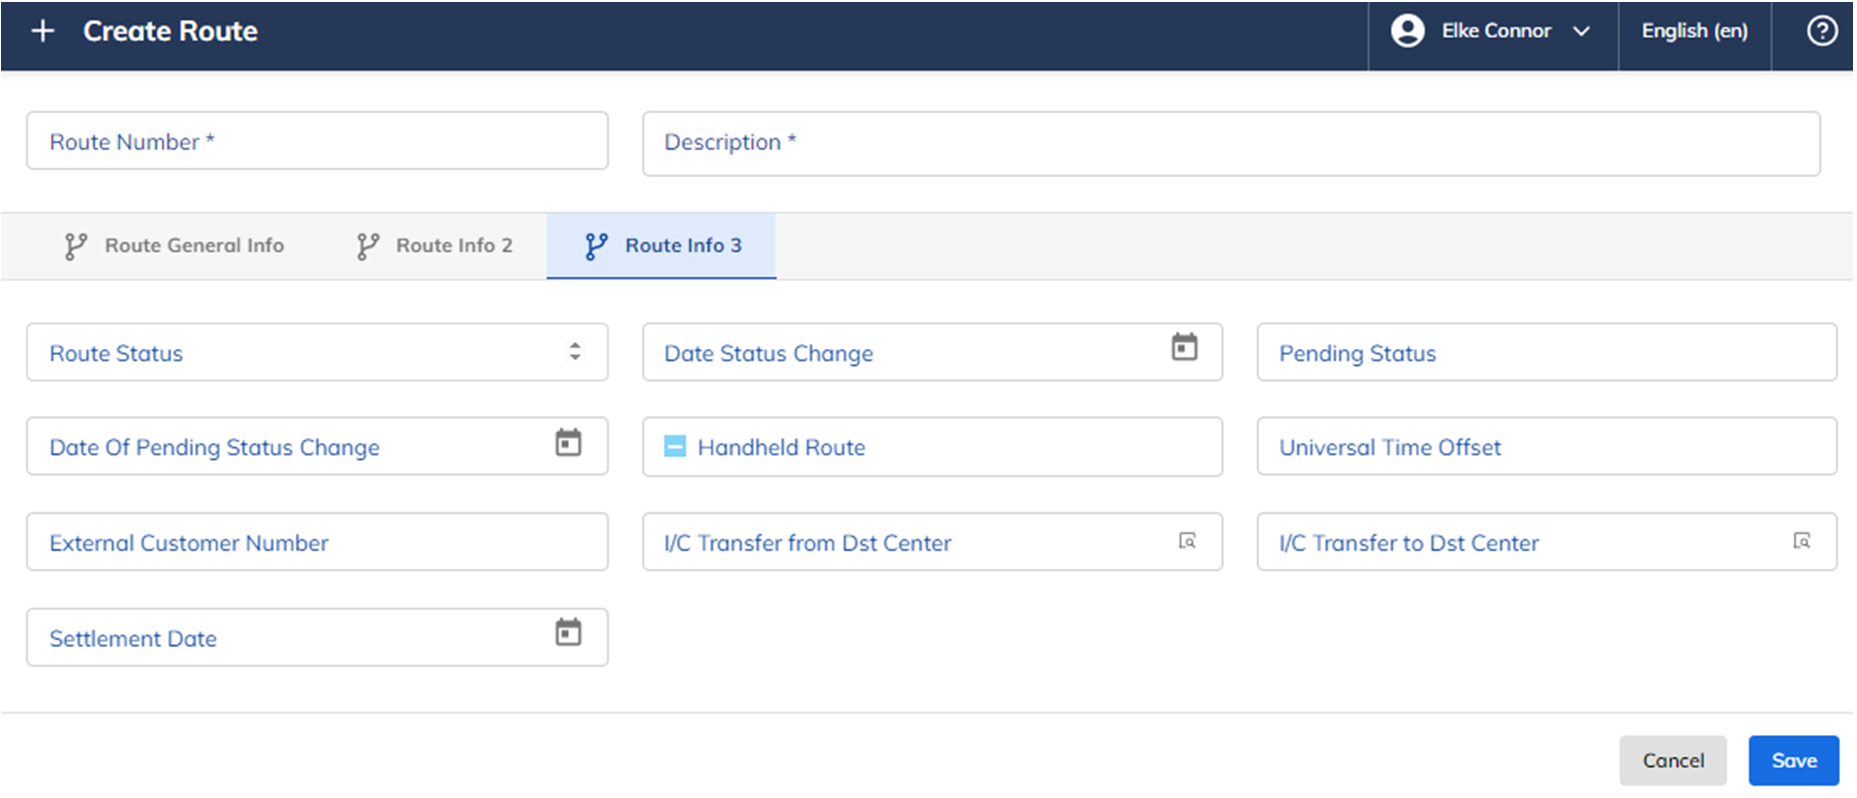
Fields
Field | Value | Recommended / Notes |
Route Status | Optional | Identifies the Route Status |
Date Status Change | Optional | Identifies the Date Status Change |
Pending Status | Optional | Identifies the Pending Status |
Date of Pending Status Change | Optional | Identifies the Date of Pending Status Change |
Handheld Route | Optional | Identifies if this is a handheld route (Yes or No) |
Universal Time Offset | Optional | Identifies the Universal Time Offset |
External Customer Number | Optional | Identifies the External Customer Number |
I/C Transfer from Dist Center | Optional | Identifies the I/C Transfer from Dist Center |
I/C Transfer to Dist Center | Optional | Identifies the I/C Transfer from Dist Center |
Settlement Date | Optional | Identifies the Settlement Date |
2.2 Edit a Route
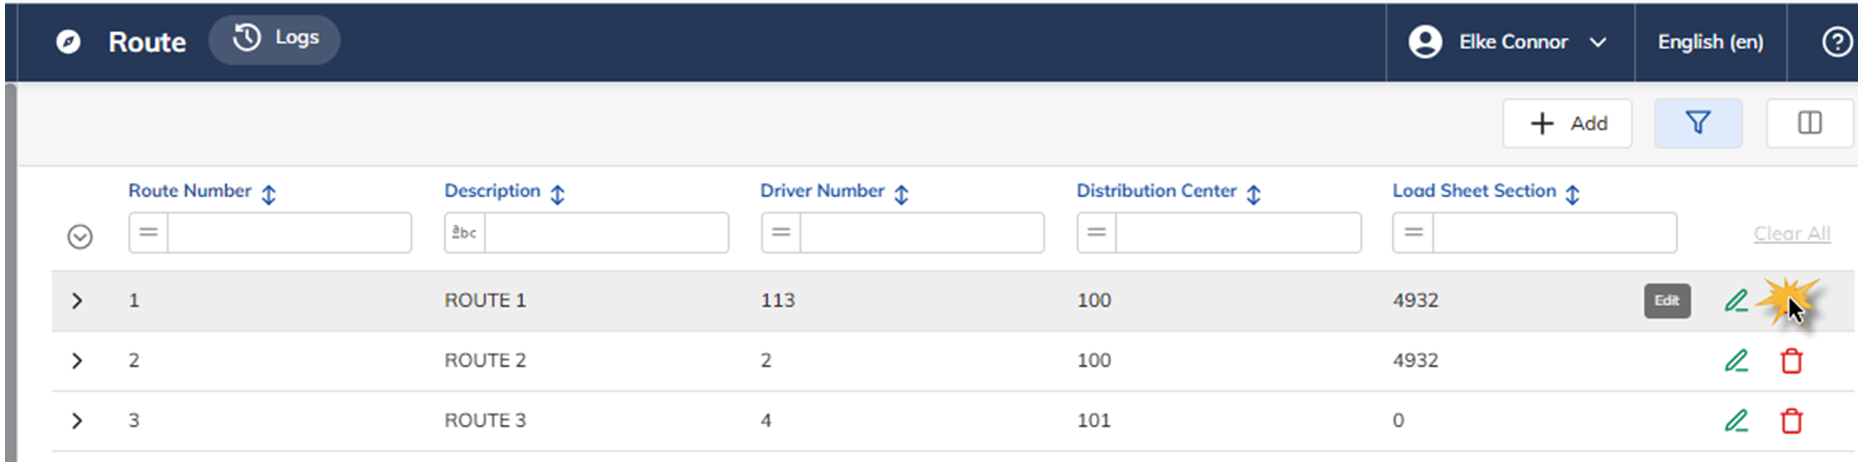
Procedures
Step | Action |
1 | Select the Pencil icon for the Route you wish to edit |
2 | Make the necessary changes. |
3 | Select the “Save” icon. A message confirming the changes to the item file is displayed. |
2.3 Deleting a Route
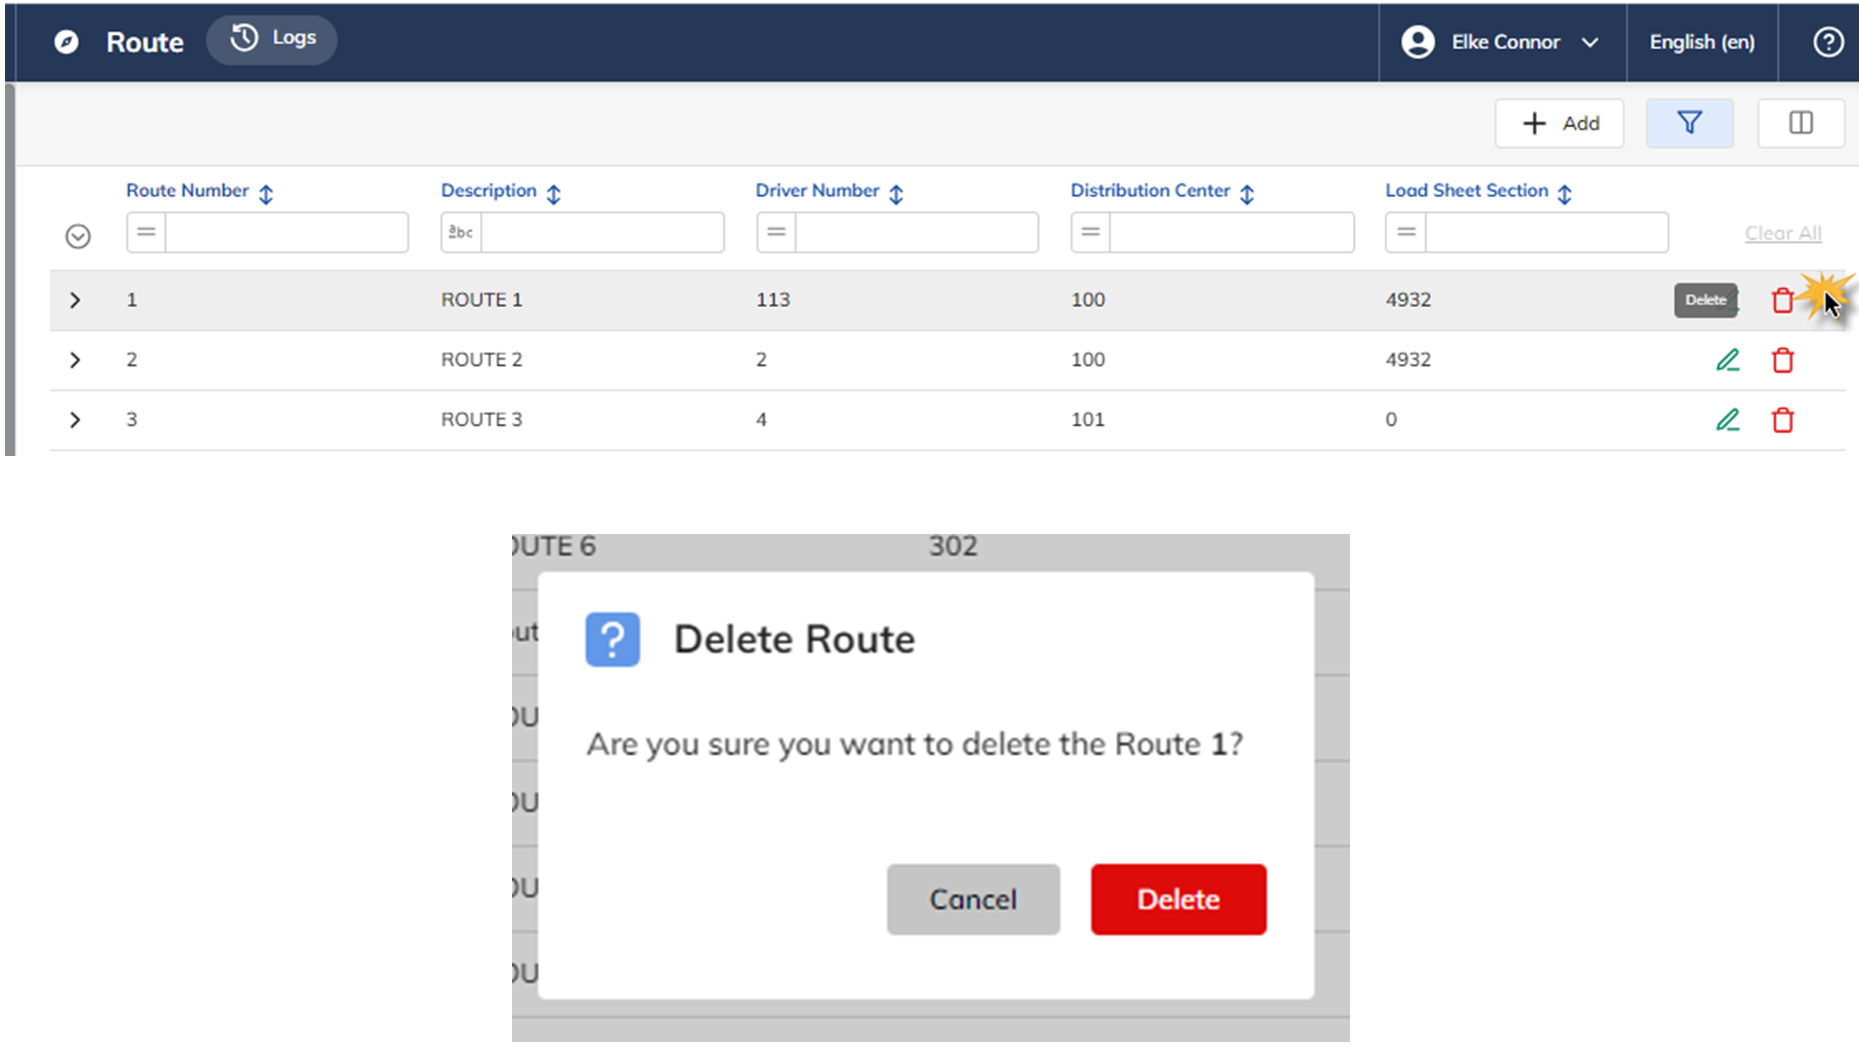
Procedures
Step | Action |
1 | Select the Route you wish to delete |
2 | Select the “DELTE” icon. |
3 | The question will appear “Delete Route”, select Cancel or Delete. |
2.4 Adding Invoice/Order Mask for HH
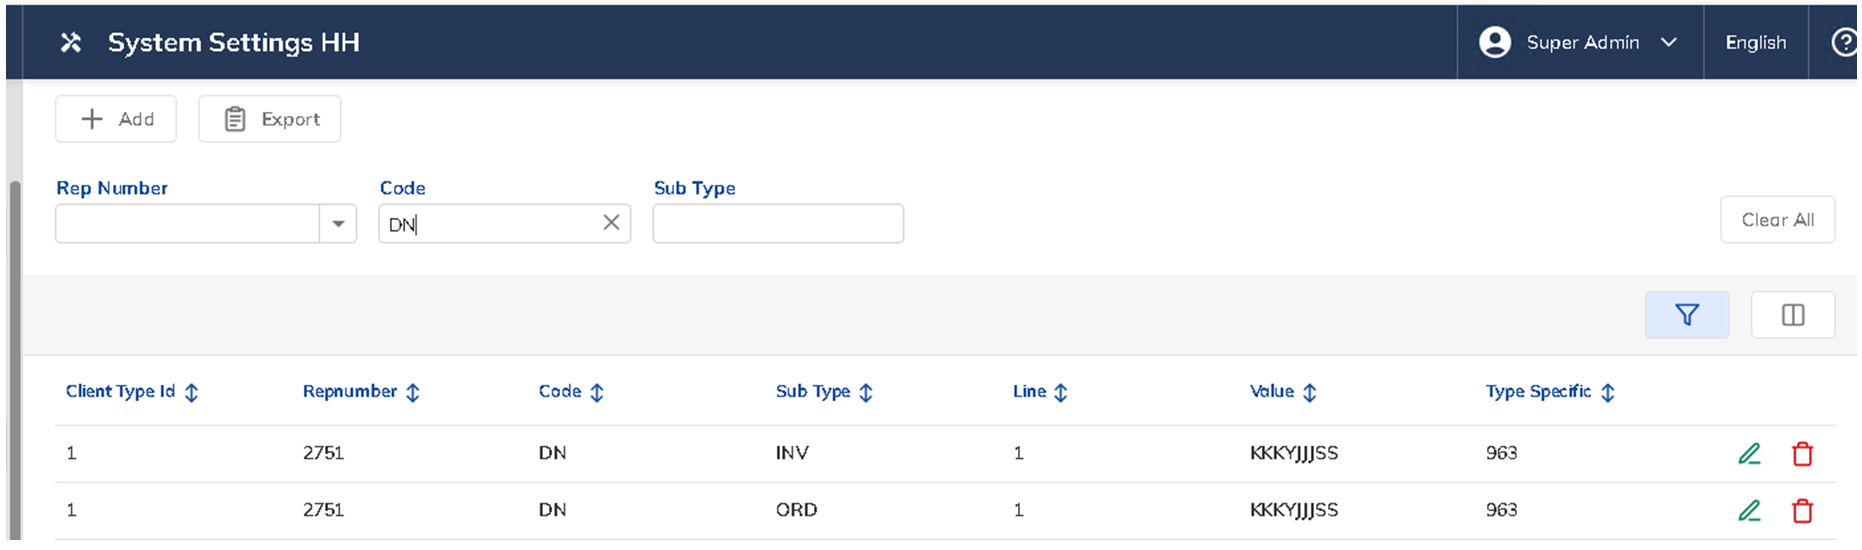
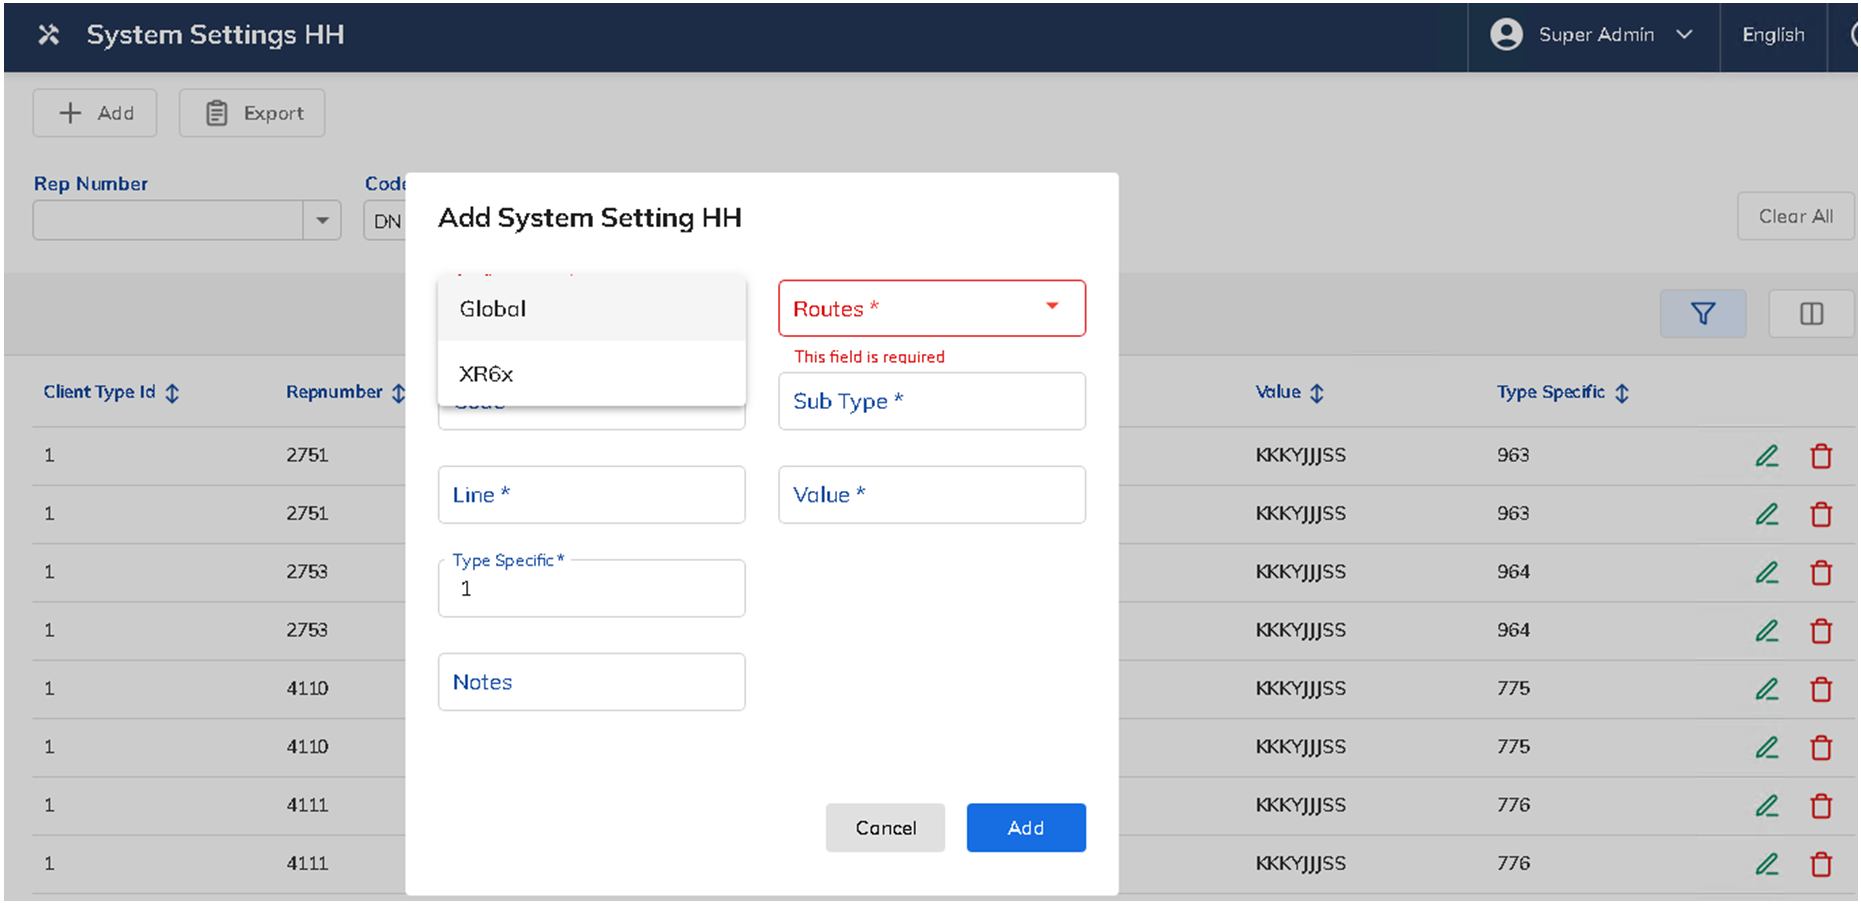
Procedures
Step | Action |
1 | Click Add Select XR6x |
2 | Enter Rep Number, Code DN, Subtyp INV and ORD, Line 1 Value KKKYJJJSS |
3 | Enter User’s Type Specific number and tap Add. |
Highlight important information in a panel like this one. To edit this panel's color or style, select one of the options in the menu.
Related articles
Filter by label
There are no items with the selected labels at this time.